If you’re feeling scared about traveling alone for the first time, that fear is completely valid. It doesn’t mean you’re not ready — it means you take this seriously. In the next 20 minutes, you’ll understand exactly why first-timer anxiety is normal, and more importantly, how to transform that fear into a structured plan that builds genuine confidence.
Most travel guides skip straight to packing lists. This one starts where every honest guide should: with the feeling that makes you second-guess the whole thing. That feeling has a name, a structure, and a system designed to work with it — not around it.
Your first solo trip is an achievement worth celebrating, not an anxiety trigger.
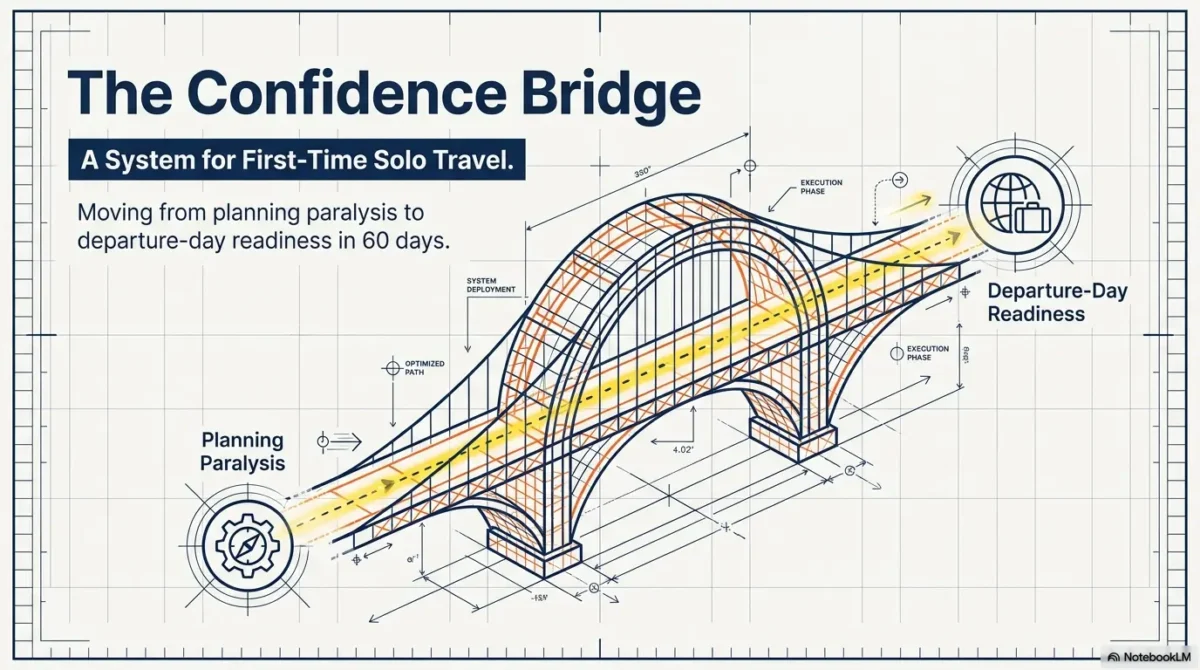
The Confidence Bridge framework exists because nervous travelers and fearless travelers are not the same population — and they shouldn’t be treated the same way. If you’ve been searching for a guide written for someone who is genuinely, specifically scared about this, you’ve found it. By the time you finish this article, you won’t just have a trip planned. You’ll have the internal scaffolding to actually go.
Quick Answer: Traveling solo for the first time feels scary for a specific reason: your brain is registering a genuine unknown. That’s not weakness — it’s anticipatory anxiety, and it’s manageable. The Confidence Bridge framework moves you through four phases — Fear Acknowledgment, Building Structure, Building Confidence, and Taking Action — so that nervousness becomes preparation, and preparation becomes confidence. You don’t need to feel ready. You need a system.
You’ve been sitting with this decision for a while. You’ve opened and closed the flight search a dozen times. You’ve watched other people post their solo travel photos and tried to figure out what they have that you don’t. Maybe you’ve told yourself you’ll go “when you’re ready” — and quietly wondered if that moment is ever going to come.
The fear isn’t that something will go wrong. The fear is that if something goes wrong, you won’t be enough to handle it. That distinction matters — because those two fears have different solutions.
What you’re feeling right now has a name. Psychologists call it anticipatory anxiety: the experience of imagining a future situation and over-predicting how badly you’ll respond to it. It’s the gap between “I don’t know how I’ll cope” and reality — which almost always turns out to be more manageable than the imagination made it. Anticipatory anxiety is not a signal that you’re not ready. It’s a signal that you’re taking the situation seriously. Both things can be true.
This section isn’t going to solve anything. It’s going to name what you’re actually experiencing — because that naming is the beginning of everything else.
Why You Feel Scared (And Why That’s Okay)
The nervousness you feel about your first solo trip is not a design flaw. It’s information. Understanding where it comes from gives you the first tool in the Confidence Bridge framework: fear acknowledgment.
Is It Normal to Feel Scared?
The travelers who insist they “weren’t scared at all” before their first solo trip are usually describing something different from what you’re feeling. They either weren’t paying attention, or they had enough prior experience that the situation didn’t register as novel. For a genuine first-timer — someone who has never navigated an unfamiliar city alone, never managed a flight connection without backup, never made decisions entirely on their own in an unknown country — the fear is proportionate. It’s calibrated to the actual situation.
This is also why “just go for it” is such useless advice. It’s advice that assumes the fear is irrational. Yours isn’t.
What Is Anticipatory Anxiety?
Anticipatory anxiety is the experience of imagining a future event and feeling the emotional and physical sensations of that event as if it’s already happening. You picture the moment your flight lands alone. You imagine yourself standing at the baggage carousel, confused, with no one to ask. You feel the tightness in your chest — right now, in your living room — as if that moment is already here.
This pattern is extremely common before first solo trips. The imagination tends to produce vivid worst-case scenarios for a simple evolutionary reason: organisms that rehearsed dangers survived more consistently than organisms that didn’t. Your nervous system is not broken. It’s doing threat rehearsal.
The problem is that threat rehearsal without a structured response produces paralysis, not preparation. That’s where the Confidence Bridge framework changes the equation.
How Do I Reframe This Fear?
Feeling nervous about your first solo trip? That’s normal and exactly why we built this system. Fear validates the importance — use it to build confidence.
Fear is not a stop sign. Fear is a signal that says: “This matters to me, and I want to get it right.” The Confidence Bridge framework takes that signal and converts it into structured preparation — a process called fear acknowledgment, which is Phase 1 of the system.
The reframe works like this: instead of interpreting fear as evidence that you’re not ready, interpret it as evidence that you’re taking the trip seriously. Then channel the energy that fear creates into building the structure that addresses it. That’s not motivational language. That’s a concrete operational shift in how you use the fear response.
You’re not trying to get rid of the fear. You’re learning to work alongside it.
What’s the Permission Here?
Here is the permission that most travel content withholds: you are allowed to travel solo while being scared. Being scared does not disqualify you. Not having traveled alone before does not disqualify you. Needing a framework to feel safe enough to go does not disqualify you.
The Confidence Bridge framework was designed for exactly the person reading this section right now: someone who wants to go, who is nervous, who doesn’t know where to start, and who needs a system — not inspiration — to get there.
The next four sections will build that system for you.
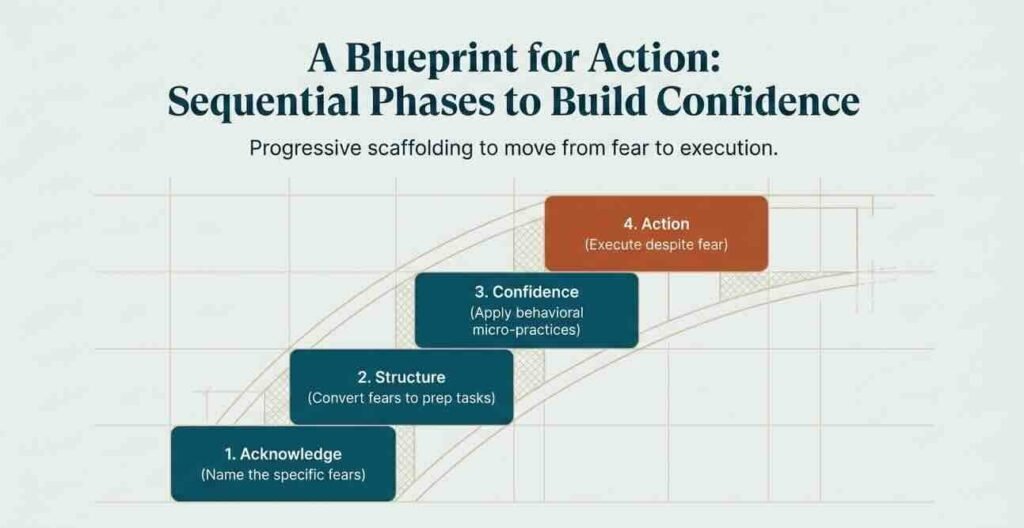
What You’ll Learn: The 4-Phase Journey to Confidence
The Confidence Bridge is a four-phase framework for first-time solo travelers. It doesn’t assume you’ll become fearless. It assumes you’ll become confident enough to act — despite the fear, with it, through it.
Here’s why the sequence matters: each phase builds on the one before it. You can’t build structure (Phase 2) until you’ve acknowledged the fear (Phase 1). You can’t build confidence practices (Phase 3) until you have structure to practice with. And you can’t take action (Phase 4) until the previous three phases have given you something real to stand on.
The 4 phases:
- Fear Acknowledgment — Name what you’re scared of. Understand why it’s happening. Learn to work with it, not against it.
- Building Structure — Create the pre-trip scaffolding that converts anxiety into specific, addressable preparation tasks.
- Building Confidence — Apply micro-practices and anxiety management techniques that build genuine belief in your capability.
- Taking Action — Execute the trip with permission to be imperfect.
One important calibration: this framework is not a one-day exercise. Apply it over the weeks or months between now and your departure. Phase 1 begins the moment you acknowledge the fear. Phase 4 begins when you board the plane.
You won’t be fearless when you go. That’s not the goal. The goal is confident despite fear — which is the only kind of courage that actually exists.
Acknowledge Your Fears: What Specifically Are You Worried About?
The most common mistake first-time solo travelers make is carrying a vague, undifferentiated mass of worry rather than a specific, named list of concerns. Vague worry is impossible to address. Named fears are solvable problems.
Below is a diagnostic checklist. Read through it and mark every fear that resonates. You don’t need to justify or explain your choices. Just notice.
SAFETY FEARS
- [ ] What if I’m targeted because I’m visibly alone?
- [ ] What if I get sick and can’t explain my symptoms in a foreign language?
- [ ] What if I end up in an unsafe neighborhood without knowing it?
- [ ] What if someone follows me back to my accommodation?
- [ ] What if there’s a natural disaster, political event, or emergency while I’m there?
- [ ] What if my travel insurance doesn’t cover what happens?
CAPABILITY FEARS
- [ ] What if I can’t navigate the airport/train/transit system?
- [ ] What if I make a decision that ruins the trip?
- [ ] What if I get overwhelmed and can’t function?
- [ ] What if something goes wrong and I freeze?
- [ ] What if my language skills (or lack of them) strand me?
- [ ] What if I’m too shy to ask for help?
LONELINESS FEARS
- [ ] What if I feel unbearably lonely?
- [ ] What if I have no one to talk to for days?
- [ ] What if eating alone in a restaurant feels humiliating?
- [ ] What if I regret not going with someone?
LOGISTICS FEARS
- [ ] What if my accommodation is dangerous or fraudulent?
- [ ] What if I miss a connection?
- [ ] What if my card stops working abroad?
- [ ] What if I overpack and can’t manage my bags alone?
- [ ] What if I lose my passport?
- [ ] What if I don’t know what to do on arrival?
JUDGMENT FEARS
- [ ] What if my family thinks this is irresponsible?
- [ ] What if people at home think I’m running away?
- [ ] What if I look incompetent in front of other travelers?
- [ ] What if I’m judged for traveling solo at my age?
- [ ] What if this trip reveals that I can’t handle being alone?
Look at your checkmarks. Notice whether they cluster in one category or spread across several. That pattern is your starting point.
If most of your checks are in SAFETY, Phase 2 (Building Structure) will do most of the work.
If most are in CAPABILITY or JUDGMENT, Phase 1 (Fear Acknowledgment) and Phase 3 (Building Confidence) are where you’ll spend the most time.
The fears aren’t problems to eliminate. They’re inputs into the Confidence Bridge system.
The Confidence Bridge: Your 4-Phase System for First-Timer Confidence
Solo travel planning isn’t complicated — it’s just a sequence.
Fear → Structure → Confidence → Action.
The Confidence Bridge is a phase-based framework, meaning the phases are sequential, not interchangeable. You don’t skip Phase 1 because you’re impatient for Phase 3. Each phase creates the conditions for the next. Here’s how each one works.
Phase 1: Fear Acknowledgment
What it is: The deliberate, structured process of naming your specific fears and understanding their psychological source.
Why it works: Unnamed fear operates as a general threat signal. Named fear can be addressed with specific preparation. The difference between “I’m just scared about everything” and “I’m specifically scared that I’ll have a medical emergency and won’t be able to communicate” is the difference between paralysis and a preparation task.
How to apply Phase 1:
- Complete the fear checklist in the previous section
- Identify your top three fears by cluster (Safety, Capability, Loneliness, Logistics, or Judgment)
- For each fear, write one sentence naming exactly what you’re afraid will happen — not the general topic, but the specific event
Example: “I’m not afraid of ‘safety in general.’ I’m afraid that at 10pm on my first night, I’ll take the wrong transport and end up somewhere I don’t recognize, alone, with no data signal.”
That specificity gives Phase 2 something to work with.
Phase 1 connects to the article: The “Why You Feel Scared” section above is Phase 1 in action. If fear acknowledgment felt useful to read, that’s because naming the psychological mechanism of anticipatory anxiety is the same move you’re applying to your own fears.
Phase 2: Building Structure
What it is: Converting named fears into specific preparation tasks — building the external scaffolding that makes the trip executable.
Why it works: Anxiety thrives in uncertainty. Structure reduces uncertainty not by eliminating risk, but by replacing vague threat with specific, addressable decisions. When you know exactly where you’re staying your first three nights, what transport you’re taking from the airport, and what number to call in an emergency, the fear doesn’t disappear — but it has nowhere to land.
How to apply Phase 2:
- For each named fear from Phase 1, identify the single preparation task that most directly addresses it
- Build a pre-trip checklist organized by fear cluster (not by category like “packing” or “documents”)
- Work through tasks in order of anxiety intensity — highest-fear items first
Example: Fear: “Wrong transport, lost, no signal.” Preparation task: Download offline maps before departure. Research airport-to-hotel transport options with multiple alternatives. Screenshot hotel address in local script. Carry local SIM instructions. This single fear, fully addressed, removes a significant portion of the anxiety.
Phase 2 connects to the article: The “Building Your Pre-Trip Structure” section below (Section 5) is Phase 2 in full. For a deeper dive into building a structured anxiety management system, the dedicated guide covers extended protocols.
Phase 3: Building Confidence
What it is: Micro-practices and mindset work completed before the trip that build genuine belief in your capability — not manufactured positivity, but earned evidence.
Why it works: Confidence doesn’t come from telling yourself you can do something. It comes from doing progressively more challenging versions of similar things and accumulating evidence of your own competence. Before traveling alone internationally, the preparation moves that build the most confidence are not booking tasks — they’re behavioral.
How to apply Phase 3:
- Solo dining practice: Eat alone at a restaurant you wouldn’t normally go to by yourself. Order from a menu, sit comfortably, stay for the full meal. The social discomfort you feel is a preview of the social discomfort you’ll feel in the first 24 hours abroad — and finishing the meal is evidence that you can handle it.
- Solo navigation challenge: Take yourself somewhere unfamiliar using only transit. No driving. Navigate the arrival-to-destination sequence alone.
- Solo decision-making day: Take a full day trip somewhere you’ve never been, making all decisions independently — where to eat, how to get there, what to see, when to leave.
Each of these generates a piece of evidence. Evidence accumulates into confidence. By departure, you’re not hoping you’ll cope — you have three data points showing that you do.
Phase 3 connects to the article: The anxiety management system in Section 6 below is Phase 3 support — the techniques you use when confidence is under pressure.
Phase 4: Taking Action
What it is: The execution phase — the trip itself — entered with Phase 1–3 preparation behind you.
Permission statement for Phase 4: You don’t need to have completed Phases 1–3 perfectly before booking the trip. You need to have done enough. Enough means: you’ve named your fears, built preparation for the biggest ones, and practiced at least one confidence-building behavior. That’s enough to go.
Phase 4 is not the end of the framework. The trip itself continues to generate Phase 3 evidence — every problem you navigate alone is a data point for the next trip. The Confidence Bridge is cumulative.
Phase 2 in Action: Building Your Pre-Trip Structure
Structure is what converts fear from paralysis into preparation. This section walks Phase 2 of the Confidence Bridge in full — six steps that build a pre-trip system specific enough to actually work.
Step 1: Choose Your Destination (And Permission to Experiment)
Choose a nearby, familiar destination for your first trip. Good infrastructure, low language barriers, and 2–4 weeks duration = ideal starter trip.
Your first destination is not the most important trip of your life. It’s an experiment. You’re collecting evidence about what kind of solo traveler you are — not determining what kind of person you are. A destination with strong tourism infrastructure, low logistical complexity, and some linguistic familiarity removes friction from your first data-collection exercise.
The decision criteria that matter most for a first trip: tourism infrastructure (developed vs. developing), language accessibility (full English-speaking vs. translation-required), distance from home (return ease if something goes wrong), and overall cost (budget pressure adds anxiety; affordable destinations reduce it). For understanding what solo travel means as a practice and how to define it for yourself, the foundational guide covers the full framework.
The full destination decision framework — including a specific decision tree — is in Section 10 of this article.
Step 2: Book Your Accommodation (First 3 Nights = Safety Net)
Book your first three nights before you leave. Not your whole trip — three nights minimum. Central location, walkable area, positive recent reviews. This is not a recommendation about what type of accommodation to choose — hotel, Airbnb, any type of accommodation you’re comfortable with all work. This is a recommendation about certainty.
Knowing exactly where you’re sleeping for your first three nights eliminates one of the largest sources of arrival-day anxiety: the open-ended decision about where to stay. After three nights, you’ll have your bearings and can make in-destination decisions from a position of familiarity rather than exhaustion.
Step 3: Create Your Rough Itinerary (Structure Reduces Anxiety)
A rough itinerary is not a rigid schedule. It’s a decision scaffold — a structure that prevents the specific anxiety of standing somewhere unfamiliar with no idea what to do next. Every first-time solo traveler who has experienced “decision paralysis in a new city” describes the same thing: too many options, no structure, the feeling of being simultaneously everywhere and nowhere.
Your pre-trip itinerary should answer three questions for each day: where am I sleeping tonight, what one thing do I want to see or do, and what’s the backup if that doesn’t work out? That’s it. One anchor per day, not a schedule.
Step 4: Share Details + Set Up Support System (The Why-You’re-Not-Alone Piece)
Before departure, share your itinerary — accommodation names, arrival dates, contact details — with one trusted person at home. Set up a check-in schedule: a brief message at arrival, a daily or every-other-day update. The check-in doesn’t need to be long. “Arrived, accommodation is good, plan for tomorrow is X” takes two minutes.
This serves two functions. First, it’s a genuine safety measure — if something goes wrong, someone knows your last known location. Second, and equally important for first-timers, it reduces the psychological experience of aloneness. The check-in with a trusted person is a thread back to your support network. Real travelers share their routines and how they set up their support systems — for specific protocols and community experience, [Reddit solo travel threads](/ solo-travel-reddit/) capture a wide range of real first-trip check-in systems.
Step 5: Download Your Tools (Tech Setup for Confidence)
Five tools, downloaded and tested before departure:
- Google Maps — offline maps for your destination city (download the offline map while on WiFi)
- Google Translate — offline language pack for your destination language
- XE Currency — real-time exchange rates, works offline
- WhatsApp — free international messaging (save your support person’s contact)
- Your accommodation’s app or booking confirmation — screenshot it, save to photos
Test each tool before departure. A tool you’ve never opened is not a safety net. Spend 20 minutes the week before you leave confirming each one works with your phone and data plan.
Step 6: Mental Preparation (Micro-Practices for Confidence)
The three micro-practices from Phase 3 — solo dining, solo navigation, solo day trip — belong in your pre-trip preparation calendar, not as optional additions. Schedule them. A solo day trip two weeks before departure generates more confidence than two weeks of additional research. For advanced anxiety management techniques that sit alongside these micro-practices, the dedicated guide covers breathing protocols, visualization methods, and grounding techniques in detail.

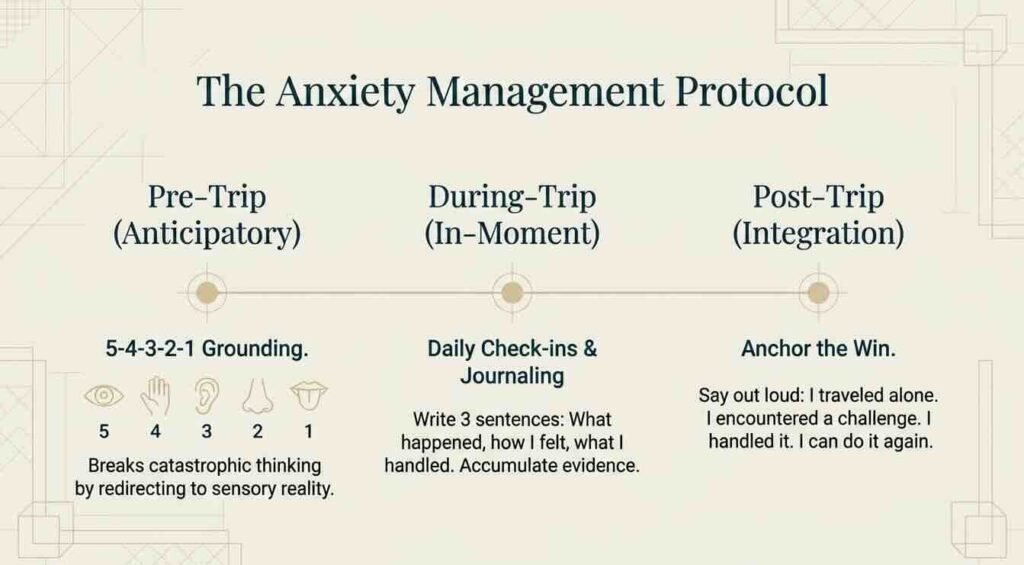
Phase 3 Support: Your 3-Part Anxiety Management System
3-part anxiety system: Pre-trip (prepare + visualize), During-trip (daily check-ins + grounding), Post-trip (celebrate + anchor confidence).
Anxiety management for solo travelers is not about eliminating anxiety. It’s about having specific protocols so that when anxiety spikes — and it will, at least once — you have a practiced response ready. What separates nervous travelers who complete the trip from those who don’t is not the absence of anxiety. It’s the presence of a system.
Here are the three parts.
Before the Trip: Pre-Departure Anxiety Protocols
The window between booking and departure is when anticipatory anxiety is most active. Three evidence-based techniques reduce it without requiring therapy or extensive practice time:
5-4-3-2-1 Grounding: When anxiety spikes, name 5 things you can see, 4 you can touch, 3 you can hear, 2 you can smell, 1 you can taste. This technique breaks catastrophic thinking by forcibly redirecting cognitive attention to sensory reality. It takes 60 seconds and can be used anywhere.
During the Trip: In-Moment Anxiety Techniques
Daily journaling check-in: Each evening, write three sentences: what happened today, how you felt, and what you handled. This isn’t therapy journaling — it’s evidence collection. After three days, you have a growing record of challenges you navigated successfully. That record is Phase 3 confidence-building data.
Group activities for overwhelm days: If solo overwhelm hits — and it’s most common on days 2 and 3 when novelty has worn off but familiarity hasn’t set in — a structured group activity (a walking tour, a cooking class, a day trip) provides connection without requiring you to make it happen socially. You show up; the social contact is built into the structure.
Grounding in the moment: Use the 5-4-3-2-1 technique from your pre-trip practice. In an unfamiliar city, it works the same way. It’s also discreet — you can do it standing on a street corner and no one will notice.
When to reach out for support: If anxiety spikes to the point where you can’t function for more than 2–3 hours, contact your check-in person. This is not failure — it’s using your support system exactly as it was designed. One phone call to someone who knows your itinerary and cares about your wellbeing resets the psychological safety baseline faster than any solo technique.
If anxiety is severe, persistent, or significantly impairing your daily functioning at home before the trip, speaking with a therapist or mental health professional before departure is a smart investment — not a sign that you shouldn’t go.
After the Trip: Integration + Confidence Anchoring
The post-trip phase is the most underrated part of confidence-building, and the one most travelers skip entirely.
Write down your wins. Within 48 hours of returning, list every challenge you navigated successfully — no matter how small. Missed turn that you figured out. Confusing transit that you decoded. Meal you ordered alone that tasted incredible. Moment of loneliness that passed. Every item on that list is Phase 3 evidence for the next trip.
Journal prompt: “What did I discover about myself on this trip that I didn’t know before I left?” This single question generates more useful confidence data than any external validation.
Anchor the confidence explicitly: Say this once, out loud or in writing: “I traveled alone. I encountered [specific challenge]. I handled it. I can do this again.” This is not motivational performance. It’s deliberate confidence encoding — creating an explicit memory trace that your brain can access when the next trip generates anticipatory anxiety.
For more detailed anxiety management protocols and community-tested techniques, the dedicated solo travel anxiety guide covers extended grounding practices, panic response protocols, and how to apply these techniques across different anxiety severity levels. Remember that Phase 1 (fear acknowledgment) — covered in the “Why You Feel Scared” section above — is the foundation these techniques rest on. Return to it if anxiety resurges.
Check-In: The Emotional Readiness Checklist (Not Just Booking-Ready)
Most travel checklists measure logistical readiness: do you have your passport, your accommodation, your flights. Those things matter, but they’re not the whole picture. A traveler can tick every logistical box and still be emotionally unprepared — and emotional unpreparedness is the one that actually causes people to cut trips short, turn around at the gate, or come home early without knowing why.
This checklist separates the two. Work through both columns honestly.
EMOTIONAL READINESS
- [ ] I have permission from myself. “Solo travel is a valid choice for me, regardless of what others think.”
- [ ] I’ve named my specific fears. “I know what actually scares me — I’ve completed the fear checklist, not just acknowledged ‘being nervous.'”
- [ ] I understand why fear is normal. “I’ve read and understood the fear acknowledgment section — I’m not confused by my own anxiety.”
- [ ] I have support lined up. “Someone I trust knows my itinerary and check-in schedule.”
- [ ] I’ve done at least one micro-practice. “I’ve eaten alone at a restaurant, taken a solo day trip, or navigated somewhere unfamiliar by transit.”
- [ ] I’m willing to feel scared and go anyway. “I understand that courage is not fearlessness — it’s action despite fear. I’m ready to act.”
LOGISTICAL READINESS
- [ ] Destination selected
- [ ] First 3 nights of accommodation booked
- [ ] Flights or primary transport booked
- [ ] Documents ready (passport valid for 6+ months, travel insurance purchased, copies stored digitally)
- [ ] Emergency contact details shared
- [ ] Tech tools downloaded and tested
If any emotional items are unchecked, that’s the work. Don’t rush to Phase 4 (Action) until you’ve addressed Phases 1–3. The Confidence Bridge works because you do the internal work first. Unchecked logistical items are tasks with clear completion criteria. Unchecked emotional items are invitations to return to the earlier sections of this article.
For real traveler accounts of how first-timers set up their support systems and emotional preparation routines, community experiences and peer stories provide useful reference points across a wide range of backgrounds and anxiety levels.
For Female Travelers: Permission + Safety + Solo Capability
This section exists because the anxiety profile for women traveling solo is different — not in intensity, but in source. Alongside the universal fears (capability, logistics, loneliness), women carry an additional layer: the social and cultural messaging that traveling alone is somehow less appropriate, less safe, or less sensible for women than for men. That messaging is worth naming and examining directly.
Can Women Travel Solo Safely?
Yes. Safety in solo travel is not primarily a function of gender — it’s a function of preparation, judgment, and environmental awareness, all of which are equally accessible to women and men. Women traveling solo face specific risks in certain contexts that require specific preparation, the same way solo travel in certain neighborhoods requires specific precautions for any traveler. The answer to “is it safe?” is the same as for any solo travel question: it depends on preparation, not on the traveler’s gender.
The practical safety practices that actually work — for anyone — are intuition-led and structure-supported. Trust your instincts when a situation feels wrong. Remove yourself from environments that feel unsafe without needing to justify it. Pre-plan your transport options so you’re not making decisions under pressure at night. These are not gender-specific practices. For women, they’re worth emphasizing because the risk profile in certain situations is genuinely different — and preparation accounts for that difference.
What Safety Practices Actually Work?
The four safety practices with the highest real-world impact for solo female travelers:
- Trust your instincts first. If a situation feels wrong, leave. You don’t need to explain it, and you don’t need to be certain. Intuition is pattern recognition running below conscious thought — it has data your rational mind hasn’t processed yet.
- Pre-plan night transport. Know in advance how you’re getting back to your accommodation after dark. Don’t make this decision at 11pm with a low phone battery. Ride-hailing apps where available; pre-arranged taxis with hotel reception where not.
- Keep your support system current. Your daily check-in with your designated contact person is especially useful here — someone who knows where you are and when they last heard from you.
- Join group activities when solo overwhelm hits. Group tours, day trips, and classes create social context without requiring you to initiate. You don’t need to make friends — you need human presence while you build your bearings.
Why Is This Different for Women?
Women traveling solo have unique safety considerations. Build confidence using the Confidence Bridge system alongside gender-specific safety practices.
The “why is it different” question has two answers. The first is practical: women face specific risks in certain contexts — street harassment, being followed, unsolicited attention — that require specific awareness practices. The second is psychological: women traveling solo carry a heavier load of social doubt than men typically report. “Are you sure you should go alone?” is asked of women with a frequency that reflects cultural anxiety, not objective risk assessment.
That social doubt is not evidence. The experience of thousands of women who have traveled solo — across every destination, every age, every background — is evidence. And that evidence consistently shows: preparation + judgment + trust in your own instincts produces safe, meaningful trips.
What Permission Am I Granting Myself?
Four explicit permissions:
- Permission to prioritize your own needs. Your solo trip is not irresponsible, selfish, or reckless. It’s yours.
- Permission to trust your capability. You have the same capacity for judgment, navigation, and problem-solving as any experienced traveler. It develops through practice.
- Permission to say no to unsafe situations. You don’t owe any person, guide, invitation, or situation your continued presence if it feels wrong.
- Permission to ask for help. Asking for help — from hotel staff, from other travelers, from local authorities — is competence, not failure.
For fear-validation frameworks that speak directly to women’s specific anxieties, the deep-dive fear validation guide covers the psychology of permission and capability in detail. For a broader exploration of why solo travel builds self-trust, the motivation guide covers both the universal mechanisms and the gender-specific dimensions.
Why Solo Travel Matters: Permission to Prioritize Yourself
Most solo travel guides tell you what to pack. This section tells you why the trip itself — the decision to travel alone — is one of the most structurally significant things you can choose to do.
What Does Solo Travel Actually Build?
Three specific capacities develop through solo travel that don’t develop as efficiently through any other experience:
Self-trust. When you rely exclusively on your own judgment — for navigation, for decisions, for managing problems — and discover that your judgment works, you develop evidence that you can trust yourself. Not belief. Evidence. There’s a significant difference. Believing you can handle things is reassuring. Knowing you can handle things, because you have, is a different kind of psychological foundation entirely.
Autonomy. On a solo trip, every decision is yours. You eat when you’re hungry, not when the group is hungry. You leave when you’ve had enough, not when everyone else has. You visit what genuinely interests you. This sounds simple. For most adults who navigate their lives around group compromise and social coordination, the experience of pure autonomy is disorienting and then profoundly clarifying. You discover your actual preferences. Many first-time solo travelers report that this is the most unexpected outcome of the trip.
Resilience. Problems arise on every trip. The transport doesn’t work. The accommodation is not what was pictured. The weather changes. When you navigate these problems alone — without backup, without someone to defer to — you accumulate evidence of your own resilience. Every problem you handle successfully is a data point that updates your self-assessment from “I hope I can cope” to “I know I can cope.”
Is This Worth the Fear?
Solo travel builds self-trust, reveals your resilience, and grants autonomy you won’t find elsewhere.
The fear is real. The discomfort is real. The outcomes are also real — and they compound. The confidence you build on your first trip transfers to your second, and your third, and eventually to challenges that have nothing to do with travel.
How Do Nervous Travelers Describe the Outcome?
The story arc is consistent across backgrounds, ages, and destinations:
“I was terrified before I left. I almost cancelled twice. The first 24 hours were hard — I couldn’t find my accommodation easily, I ate alone awkwardly, I missed home. By day three, something shifted. By day seven, I didn’t want to leave. When I got home, I didn’t understand why I’d been so scared — and I understood completely at the same time.”
For a deeper exploration of why solo travel builds self-trust and autonomy, the full motivation guide covers the psychology of the decision, common barriers to permission-granting, and how to apply the Confidence Bridge framework to the “should I go?” question.
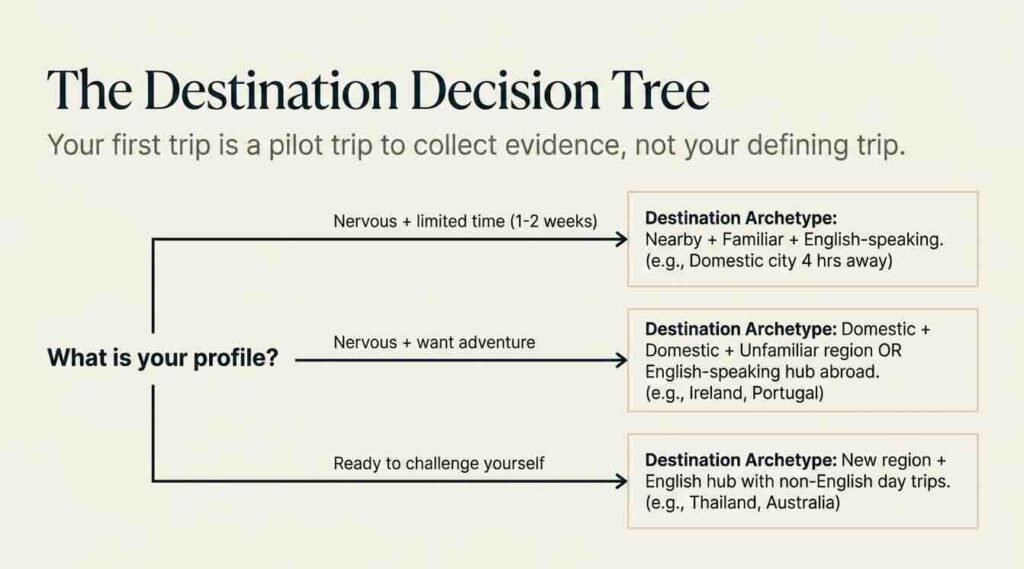
How to Decide: Your First Destination Without Overthinking
Decision paralysis is one of the clearest signs that Phase 1 (fear acknowledgment) hasn’t been fully completed. When every destination feels like the wrong choice, the problem is usually not the destination — it’s unaddressed underlying anxiety about any destination.
That said, destination choice does matter for reducing first-trip friction. Use this framework.
Step 1: Identify Your Decision Criteria
Five variables matter most for a first trip:
- Proximity — How close to home? Closer = easier return if something goes wrong; farther = more adventure
- Tourism infrastructure — Developed infrastructure means better English signage, reliable transport, easy-to-navigate accommodation. Developing means more spontaneity and challenge.
- Language — Fully English-speaking destinations remove one major source of friction. Non-English destinations add it — manageable with preparation, but a real variable for a first trip.
- Cost — Budget pressure amplifies anxiety. A financially comfortable first trip is a more useful data-collection exercise than one where you’re constantly recalculating.
- Climate — Familiar climate reduces novelty load. New climate (humidity, extreme heat, monsoon) adds it. Factor it into your overall novelty budget for the trip.
Step 2: Use This Decision Tree
| Your Situation | Recommended First Trip |
|---|---|
| Nervous + limited time (1–2 weeks) | Nearby + familiar + English-speaking (domestic or adjacent country) |
| Nervous + want some adventure | Domestic + unfamiliar region, or English-speaking hub city abroad (2 weeks) |
| Ready to challenge yourself | New region + English hub with non-English day trips (10–14 days) |
Step 3: First Destination Examples (by region)
These are starting-point examples, not prescriptions. Your decision criteria determine the right fit — these illustrate how the framework applies:
- North America: A domestic city 4–6 hours away that you’ve never visited independently
- Europe: Ireland, Portugal, Spain, or the Netherlands (English-accessible, well-developed tourist infrastructure, strong backpacker culture)
- Southeast Asia: Thailand, Malaysia or Vietnam — tourism infrastructure, affordability, adventure access, large solo traveler communities
- Oceania/Pacific: Australia (Sydney, Melbourne) — English-speaking, first-world infrastructure, high solo traveler culture
Step 4: Give Yourself Permission
Your first trip is not your defining trip. It’s your pilot trip — the one where you collect evidence, learn your preferences, discover your patterns, and generate the data you’ll use to plan the second one. It doesn’t have to be exotic. It doesn’t have to be long. It doesn’t have to be impressive.
Once you’ve made the decision, come back to Phase 2 in Action above for the booking steps. When you’re ready to build an activity progression framework for future trips, the adventure travel guide covers how to build challenge and complexity incrementally after your first data-collection trip.
Before You Leave: Practical Logistics Checklist
Documents
- [ ] Passport valid for at least 6 months beyond your return date
- [ ] Travel insurance purchased and policy details downloaded
- [ ] Digital copies of passport, insurance, accommodation confirmation, and emergency contacts stored in email and cloud storage
- [ ] Visa requirements checked and secured if required
Money
- [ ] Primary bank card (notify your bank of travel dates to prevent freezing)
- [ ] Backup card from a different network, kept separately from your wallet
- [ ] Local currency for first 24 hours (cover transport, food, and initial tips without needing an ATM immediately on arrival)
- [ ] Small emergency cash reserve in a separate, hidden location
Health + Safety
- [ ] Prescription medications with sufficient supply (plus 7-day buffer)
- [ ] Basic first aid: blister pads, pain relief, anti-diarrheal, rehydration sachets
- [ ] Any vaccinations required or recommended for your destination (check 4–6 weeks before travel; some require multiple doses)
- [ ] Emergency contact card: your name, blood type, allergies, emergency contact name and number
Communication
- [ ] International SIM or data plan arranged for your destination
- [ ] WhatsApp installed and tested with your support contact
- [ ] Offline maps downloaded
- [ ] Accommodation address saved as contact on your phone
Where to Stay: Your Accommodation Strategy
Where to Book
For your first three nights, book in advance. Central location in a well-reviewed area — close to public transport, walkable to at least one main area of the city. Central accommodation eliminates the anxiety of navigating an unfamiliar transit system on arrival day.
For the rest of your trip, book 24–48 hours ahead as you go. This gives you flexibility while maintaining enough certainty to avoid arrival-day decision paralysis.
What to Look For in Reviews
Three things matter most in accommodation reviews for solo travelers: recent reviews (within the last 6 months, reflecting current conditions), solo traveler mentions (look for terms like “safe neighborhood,” “easy to navigate,” “staff helpful with directions”), and neighborhood context (read the surrounding area notes, not just the property).
Hotel vs. Accommodation Types
Hotels, Airbnbs, and other accommodation types all work for solo travel. Your choice should reflect your comfort level and anxiety profile. Hotels offer predictability and on-site staff support — useful if your Capability fears are high. Airbnbs offer a home-base feel — useful if Loneliness fears are primary. Any centrally located, well-reviewed accommodation in a safe neighborhood is a valid first choice. The accommodation type matters far less than the location and the reviews.
📩 Ready to book your first trip? Use the decision framework above + the free Confidence Bridge Booking Checklist — delivered with email signup.
Your Burning Questions Answered
What is a good first time solo trip?
Nearby, familiar destination; short duration (weekend–2 weeks); good tourism infrastructure; book first 3 nights in advance. Your goal: comfortable, not perfect.
Is it normal to feel scared about solo travel?
Yes. Feeling nervous about solo travel is completely normal and healthy. It means you take it seriously. Fear validates importance — use it to build confidence, not avoid travel.
What should you avoid when traveling solo?
Avoid unlit areas alone at night, unofficial taxis, oversharing personal details, excessive drinking with strangers, ignoring your gut. Your intuition is your best safety tool.
Is 27 too old to solo travel for the first time?
No. 27 is actually ideal. You have financial stability, life experience, and emotional maturity. First solo trips happen at every age 18–65. You’re not “late.”
What do female solo travelers need to know?
Use the Confidence Bridge system + gender-specific safety (trust your gut, travel groups, support system). Your fear is valid; your capability is equal. Permission granted to go alone.
How do you manage anxiety before your first trip?
3-part system: Pre-trip (breathing, visualization, grounding), During-trip (daily check-ins, group time, grounding), Post-trip (celebrate, journal, anchor confidence). Name your anxiety; structure transforms it.
Why should you travel solo?
Solo travel builds self-trust, reveals resilience, and grants autonomy. It’s permission to prioritize yourself. The outcome — unexpected confidence — is worth the initial fear.
Conclusion
Before you found this article, you were carrying a general mass of fear about solo travel — the feeling that everyone else seems more capable, more experienced, more suited to this than you.
You’re leaving with something different.
You have a named system: the Confidence Bridge. You’ve identified your specific fears from the checklist rather than carrying them as vague anxiety. You have a 4-phase framework — Fear Acknowledgment, Building Structure, Building Confidence, Taking Action — that converts each of those fears into a preparation task. You have a 3-part anxiety management system for when nerves spike before and during the trip. You have a decision framework for choosing your first destination without spiraling into paralysis.
None of this makes you fearless. It makes you equipped.
Your next step in the next 24 hours: Go back to the fear checklist in Section 3. Pick your single highest-fear item. Write one sentence naming exactly what you’re afraid will happen. Then identify which Confidence Bridge phase addresses it. That’s it. One sentence, one phase. That’s Phase 1 beginning in practice.
This week: decide on a destination using the decision framework in Section 10. This month: work through Phases 1–3. Schedule the three micro-practices — solo dining, solo navigation, solo day trip. Next month: book the trip.
When you’re ready to address specific anxiety patterns in more depth, the fear validation and permission guide is the next step. For extended anxiety management protocols, the dedicated anxiety guide covers techniques beyond what this framework introduces.
The Confidence Bridge is yours now. Use it.
About the Author
Zisco Nueda is the founder of Solo Travel Ready and has coached hundreds of nervous first-time solo travelers through pre-trip anxiety and first-trip execution. The Confidence Bridge framework was developed over 10+ years of working with travelers across every age, background, and destination — from nervous first-timers in their late 20s to life transitioners in their 50s taking their first independent trip.
The framework documented in this article reflects patterns observed consistently across hundreds of first-trip coaching conversations. If you’re reading this and you’ve been sitting on the decision to go: the framework works. The system does what it says.
Published: 2026-06-15 | Methodology: Confidence Bridge framework, 10+ years first-trip coaching, 500+ traveler case observations.
Resources & Tools
Apps (download before departure)
- Google Maps — Offline navigation; download destination city map on WiFi
- Google Translate — Offline language support; download destination language pack
- XE Currency — Real-time exchange rates; works offline
- WhatsApp — Free international messaging for support system contact
- Rome2rio — Transport planning across flights, buses, trains, and ferries
Planning Tools
- Booking.com / Airbnb — Accommodation booking with verified guest reviews
- International SOS — Travel health, security alerts, and insurance resources
Emergency & Safety
- Your country’s embassy website — Travel advisories and local contact information for your destination (varies by nationality)
- Your travel insurance emergency line — Save this number before departure, separate from your insurance documents