







Traveling solo for the first time can feel like a huge decision, and that is a sign you’re taking it seriously. Being nervous doesn’t mean you’re unready. It means the trip matters to you and your mind is asking for a plan.
Most advice for first-timers stops at “just book it.” That doesn’t help when you’re lying awake running worst cases. What helps is a system that names the fear, gives you specific things to do about it, and ends with a booked trip and a departure date.
The system is the Confidence Bridge. It has four phases: acknowledge the fear, build structure, build confidence, then act. You won’t finish it fearless. You’ll finish it prepared, which is the version of confident that holds up in an airport at midnight.
Your first solo trip can feel huge because it matters to you. Here is a system that turns that nervousness into a plan you can follow.
This guide walks through why first-timer fear makes sense, how to sort it into problems you can solve, and how each phase of the Confidence Bridge gets you from “I’m not sure I can” to “I’m booked and I know what I’ll do when I land.”
Why You Feel Scared About Traveling Solo for the First Time (And Why That’s Okay)
Your nervousness about a first solo trip is not a personality flaw, and it isn’t a sign you should stay home. It’s your brain reacting to something new and important.
Is It Normal to Feel Scared?
Yes, it’s normal, and it’s common before a first solo trip. The feeling has a name: anticipatory uncertainty, the fear you feel before a new experience rather than during it. It isn’t a diagnosis on its own. It’s a common reaction to uncertainty, and it can also show up as one symptom of an concern that extends beyond travel, which is when professional support helps.
A first solo trip triggers it about as reliably as anything can. You’re leaving your usual support, entering an unfamiliar place, and making decisions with no one to check with. Your mind reads that correctly as new and important. The uncertainty is real. What you do next is the part you control.
What Is Anticipatory Uncertainty?
Anticipatory worry is fear of what you don’t know yet, not fear of anything that is happening now. Your mind projects forward into situations it has no information about and fills the gaps with worst cases.
Take Maya, a composite of the first-timers this guide is written for. She has booked a flight and it’s 11pm, three weeks before departure. Her mind runs the same loop: I’ll land and won’t know where to go. I’ll get into the wrong taxi. Nobody will know I’m in trouble. None of that has happened, and she has nothing to base it on. She has never done this before, so her brain has nothing to go on and fills in threats instead.
Reassurance doesn’t stop that loop. Specifics do. Once Maya has a plan for the taxi rank, a step-by-step for the first hour at the airport, and a check-in arranged for the first night, her mind has real information to work with and the loop quiets. That is the idea the rest of this guide is built on: replace the unknown with something specific.
How Do I Reframe This Fear?
Feeling nervous about your first solo trip is normal. The nerves flag something that matters, so build a plan instead of avoiding the trip.
Fear is information, not a verdict. When you feel it, your mind is telling you this deserves preparation. The mistake is reading it as “I can’t do this” when it means “I need a plan.” Phase 1 of the Confidence Bridge starts exactly there: naming the fear instead of pushing it down or trying to think positively over it.
What’s the Permission Here?
You’re allowed to be scared and still go. The fear doesn’t have to disappear first.
Most people who’ve done it describe being nervous before their first trip. If you want a closer look at why first-timer fear feels so loud, that article breaks down the specific fears and how they behave. The ones who went weren’t less afraid. They had enough structure to take the next step.
What You’ll Learn: The 4-Phase Journey to Confidence
When you’re traveling solo for the first time, the Confidence Bridge works because each phase builds on the one before it, so the order matters. A checklist can’t do that. A sequence can.
Phase 1 is fear acknowledgment. You name what scares you and stop treating it as a judgment on your ability.
Phase 2 is building structure. You set up the practical answers, such as where you’ll sleep, how you’ll get there and who knows where you are. Phase 3 is building confidence. You do small solo things at home so your nervous system learns what being alone feels like. Phase 4 is taking action, which means you book the trip and go.
Expect it to take weeks, not a weekend. And expect to finish confident despite fear, not free of it. Confident despite fear means you still feel the nerves on departure day and you go anyway, because you’ve done the work that makes going workable.
Maya’s six weeks look like this.
On departure morning her stomach is still tight and she’s still overthinking the airport. She goes. By the second day she has worked out the transit system, found a restaurant she likes and messaged her check-in contact twice. The worry hasn’t vanished, but by day three it has stopped being the loudest thing in her head. That shift is what the four phases are for.
Acknowledge Your Fears: What Specifically Are You Worried About?
“What if something goes wrong?” can’t be solved. “I’m worried about finding my way out of an unfamiliar airport at night” can. Naming a fear precisely is what turns it into a problem you can work on.
Read through the five groups below and check anything that sounds like you. Each group ends with how the Confidence Bridge handles it.
Safety fears
- [ ] Getting robbed, pickpocketed or scammed
- [ ] Being followed or targeted because I’m alone
- [ ] Ending up in an unsafe neighborhood
- [ ] Not being able to call for help
- [ ] Getting sick abroad with no one nearby
- [ ] Taxis, night buses and riding alone
These are real concerns, and most of them have a practical answer in Phase 2.
Ability fears
- [ ] Making the wrong decision with no one to check with
- [ ] Getting through airports and transit alone
- [ ] Not speaking the language
- [ ] Getting lost and not knowing what to do
- [ ] Freezing when it matters
- [ ] Not being sharp or experienced enough
These are about trusting yourself, and Phase 3 is where you build that trust.
Loneliness fears
- [ ] Eating alone and feeling exposed
- [ ] Having no one to share moments with
- [ ] Getting homesick and not coping
- [ ] Being stuck alone with my own thoughts
- [ ] Meeting nobody for the whole trip
These are normal too, and they respond well to small rehearsals at home.
Practical fears
- [ ] Losing my passport or having it stolen
- [ ] Running out of money or having my card blocked
- [ ] A cancelled flight with no one to help me rebook
- [ ] Booking the wrong place or getting scammed on a booking
- [ ] Ending up stranded with no clear next step
Each of these becomes a checklist item once you reach Phase 2.
Family and social fears
- [ ] Family worry making me feel guilty
- [ ] A partner or friends not understanding why I want to go alone
- [ ] Looking naive or foolish
- [ ] Being judged for traveling alone, especially as a woman
- [ ] Coming home feeling I failed, or cutting the trip short
These are about permission, and Phase 1 addresses them directly.
Look at what you checked. Most people find their fears cluster into safety, which is external, and ability, which is internal. The Confidence Bridge covers both: structure handles the external ones and confidence-building handles the internal ones. The list is a starting point, not a full inventory, so add fears of your own. Your checked boxes are your starting map for everything that follows.
The Confidence Bridge: Your 4-Phase System for First-Timer Confidence
I’ve traveled solo since 2001, much of it through Southeast Asia, and I built the Confidence Bridge from what I kept seeing in first-timers, including in myself. They arrived overwhelmed, and not because they lacked information. The advice they’d read was too vague to act on, or so tied to one destination that it fell apart the moment something unexpected happened.
Solo travel planning is a sequence, not a mystery. The Confidence Bridge has four phases: acknowledge fear, build structure, build confidence, act.

The goal was never a perfect trip. It was a traveler who can handle an imperfect one. Skipping phases is why “just book the trip” fails nervous people, so here is each phase in order.
Phase 1: Fear Acknowledgment
Phase 1 is the step most solo travel advice skips, and skipping it is a big reason nervous first-timers never follow through. The job is to name your fear precisely, understand why it appears, and stop treating it as a verdict.
You did the naming in the last section. Now sort your checked fears into two columns. A gap is a fear that points at something you can prepare for. “I don’t know what I’d do if I lost my passport” is a gap, and the answer is practical: digital copies, the embassy’s contact details, a plan.

A pattern is a fear your mind generates without evidence, like “What if I fall apart and can’t function at all?” That one is catastrophizing, and it has no checklist answer. It needs you to sit with the discomfort, call it a pattern instead of a prediction, and decide to go ahead.
Gaps go to Phase 2. Patterns stay here, and the work is the permission from earlier: you’re allowed to be scared and still go. Phase 1 ends when you decide enough structure is in place to take the next step. For some people that’s an afternoon. For others it’s a week, and neither is wrong.
Phase 2: Building Structure
Structure is the antidote to anticipatory uncertainty, because worry thrives where information is missing. Phase 2 answers the questions your mind keeps asking. Where will I sleep? How do I get from the airport? What if my card doesn’t work?
Every unanswered question is an open loop, and each fear you named becomes an action. “Getting stranded” becomes carrying a backup card on a different network. “Transport” becomes writing down a trusted airport transfer before you leave. You aren’t guaranteeing nothing goes wrong. You’re making sure the moments most likely to spike your worry have answers you decided on calmly at home.
The six concrete steps are laid out below in Phase 2 in Action. Plan on one to three weeks. Rush it and you’ll leave under-prepared. Wait past four weeks without booking, and you tend to slide back into avoidance.
Phase 3: Building Confidence
You don’t build confidence by reading about travel. You build it by doing solo things in low-stakes places before the trip.
Eat one meal alone at a restaurant, without your phone as a prop. That tests the most common first-timer fear, being seen alone, somewhere you can recover from it. Take a day trip to a part of your region you don’t know, using only public transport and the same navigation tools you’ll use abroad. Go to a museum or a film on your own. Then add the readiness practices from the Phase 3 Support section below, and do them daily, not only in a crisis.
If your worry runs deeper than first-trip nerves, the broader Fear & Readiness framework goes further than this guide can. Give this two to four weeks with at least one practice a week. The point is evidence, and each solo outing shows your nervous system that being alone is manageable.
Phase 4: Taking Action
Phase 4 has one job: you book the trip.
Nervous travelers get stuck here more than anywhere, waiting to feel ready. Readiness is built by acting, so the feeling you’re waiting for doesn’t arrive first. Choose your destination with the decision steps later in this guide, book your flights and your first three nights, and set your check-in plan with someone at home. After that first trip, a ladder of solo activities to build toward shows how to follow it with harder ones.
Then expect some worry on departure day. For some people it peaks in the last day or two before leaving, once the trip stops being an idea. It often eases after arrival, when real information replaces guesses, though the timing varies from person to person. Go anyway.
Building Your Pre-Trip Structure
Phase 2 in Action
Phase 2 turns worry into preparation, and the order below is deliberate. Each step closes a specific loop before the next one opens.
Step 1: Choose Your Destination (And Permission To Experiment)
For a first trip, choose somewhere nearby and familiar, with good infrastructure, few language barriers, and a length of about 7 to 14 days.
The destination decision paralyzes more first-timers than any other choice, so judge it on four criteria instead of inspiration. Infrastructure comes first: transport, accommodation and hospitals that work reliably mean fewer problems for you to solve.
Language is next. A place where you can get by in English takes some of the mental load off, and that’s smart, not weak. Then look at distance. A flight within about four hours of home leaves you less jet-lagged than sixteen hours in the air on a trip that’s already a lot to handle.
Finally, length: seven to fourteen days is long enough to find your rhythm and short enough that one bad day doesn’t define the trip.
If you want a clearer picture of what you’re signing up for, what solo travel actually means is a useful read before you commit. You’re also allowed to treat this as an experiment.
Step 2: Book Your Accommodation (First 3 Nights = Safety Net)
Book your first three nights before you leave, and only those. Three nights gives your nervous system a secure base to land on without housing stress in the first hours.
Pick a central place you can reach on foot from transit and food, in a neighborhood with people around when you’ll be arriving. Read the last ten or so reviews, written in the past six months, instead of trusting the average score. Leave everything after night three open. Choosing your next place with local knowledge is easier than choosing it from your sofa.
Step 3: Create Your Rough Itinerary (Structure Reduces Uncertainty)
A rough itinerary is a list of things you’d like to do, in loose order, with nothing locked in except day one. It closes the “I’ll be bored and alone” loop.
Plan about three things a day. Two can be free, such as walking a neighborhood or wandering a market, and one should be something you specifically want, like a meal or a landmark. Keep it in a notes app, not a spreadsheet, because it’s a comfort document and not a schedule. You’ll drop half of it by day two, and that’s part of the trip.
Step 4: Share Details + Set Up Support System (The Why-You’re-Not-Alone Piece)

Solo travel doesn’t mean having no support. It means your support is remote instead of beside you.
Before you leave, give one trusted person your accommodation details and rough itinerary. Agree on a check-in rhythm, for example a short message every 48 hours, or every 24 if that feels better. Agree on what happens if a check-in is missed: who they call and when. This isn’t only for emergencies. It calms the “what if I disappeared and nobody knew” fear, one of the most common on the list above, by turning it into a plan.
Step 5: Download Your Tools (Tech Setup for Confidence)
Three apps do most of the work of lowering logistical worry.
Download an offline map of your destination in Google Maps, so you’re never fully lost without data. Download the offline language pack in Google Translate, which also reads signs and menus through your camera. Set up WhatsApp and test it with your check-in person, because it’s the simplest way to stay in touch over Wi-Fi. Turn on transaction notifications in your bank’s app as well, so you see every charge as it happens. Set all of it up at home, not in the airport.
Step 6: Mental Preparation (Micro-Practices for Confidence)
The micro-practices from Phase 3 start here, in the weeks before you leave. One solo meal, one public-transport day trip in an unfamiliar area, and one museum or gallery visit on your own, phone away.
They aren’t optional warm-ups. They’re worth more than any amount of reading because they give your nervous system real data about being alone and coping. Pair them with the readiness practices in the next section, and the two reinforce each other.
Your 3-Part Readiness Support System
Phase 3 Support
worry doesn’t end when you board the plane. It changes form, from fear of the unknown before the trip to reactions to real events during it. This system covers both across three windows: before, during and after.

The readiness plan has three windows: prepare before you go, ground yourself during the trip, and anchor what you learned afterward.
These are self-guided preparation techniques, not therapy or diagnosis. If a concern is severe, persistent, or extends beyond travel, use qualified professional support alongside this guide.
Before the Trip: Pre-Departure Readiness Practices
The aim before you leave isn’t calm. It’s getting good at returning to calm when worry spikes, which it will. Practice three techniques for two to three weeks before you leave, so they’re automatic when you need them.
Box breathing is the first. Breathe in for four counts, hold for four, out for four, hold for four, and repeat for four rounds. Slow, even breathing is a common way to settle yourself when your heart is racing, and it costs nothing to try daily.
Visualization is the second. Spend five to ten minutes a day picturing a specific sequence: landing, finding your transfer, checking in, eating your first meal. Include the sounds and how your body feels, so your mind has a successful version to remember when it starts running worst cases.
The third is a grounding exercise called 5-4-3-2-1. Name five things you can see, four you can feel, three you can hear, two you can smell and one you can taste. It takes about 90 seconds and works in an airport queue. For a guided version, use the meditation practice for travel.
These techniques help with situational nerves. If your worry is severe or constant, that’s a job for a professional. If it’s somewhere in between, a step-by-step approach to solo travel readiness goes further than this section can.
During the Trip: In-the-Moment Grounding Practices
The first 48 to 72 hours are usually the hardest. Your routines are gone, everything is new, and you don’t have proof yet that you’re managing.
Each evening, write three lines: what went well, what was hard, and one thing you’d change. It stops the day’s stress from piling up and builds a written record of what you’ve handled. On days when being alone feels heavy, join a walking tour or a cooking class. You get company for a few hours without having to start a deep conversation, and it works best when you book it before you feel overwhelmed. If your mind starts to spiral, use the 5-4-3-2-1 exercise you practiced at home.
I remember a night train out of Bangkok, a route I’d taken before, when a specific dread settled in around hour two. Nothing was wrong and the train was on time, but I knew nobody on it and felt very far from anything familiar. I tried box breathing for the first time that night, only because I’d read about it and had nothing else to try. It didn’t make the dread vanish. It gave my hands and attention something to do, and that turned out to be enough.
If your worry is acute, send a quick message or voice note to your check-in person. You don’t need a long conversation, and knowing someone can be reached softens the feeling of being completely alone.
Know your limit too. Mild discomfort is expected. If a concern becomes severe, stops you eating, or keeps you inside your room, tell someone at home and seek qualified professional support. Do not try to push through a serious concern alone.
After the Trip: Integration + Confidence Anchoring
What you do afterward decides how much of the trip stays with you. Do three things while it’s fresh.
Write down specific wins, not “I survived.” Name the language moment, the transport mix-up you fixed, the meal you ate alone without misery. Your worried mind will shrink them later unless they’re on paper. Then note honestly what was harder than expected and what you’d change, because a first trip’s difficulties become the next trip’s preparation. Finally, say it plainly, aloud or in writing: “I did this, alone, and I was scared when I went.” That turns the trip into something you know about yourself. It’s also how Phase 3 confidence carries into Phase 4 of your next trip.
Check-In: The Emotional Readiness Checklist (Not Just Booking-Ready)
You can have every booking confirmed and still not feel ready. Logistical readiness means your flights, accommodation and documents are sorted. Emotional readiness means you’ve done the inner work that makes those logistics usable. They’re different problems with different solutions, and you need both.
Emotional readiness
- [ ] I’ve given myself permission. Solo travel is a valid choice for me, whatever others think.
- [ ] I’ve named my specific fears, not a general worry.
- [ ] I understand anticipatory uncertainty as a mechanism, not a verdict.
- [ ] Someone knows my itinerary and we have a check-in plan.
- [ ] I’ve done at least one micro-practice, such as a solo meal or a day trip.
- [ ] I’m willing to feel scared and go anyway.
Logistical readiness
- [ ] Destination chosen
- [ ] First three nights booked
- [ ] Flights or transport confirmed
- [ ] Passport, insurance and document copies ready
- [ ] Emergency contacts shared with my support person
- [ ] Offline maps and messaging set up
To see what first-timers say they wished they’d checked, read what first-timers packed and wish they’d known.
If the emotional items are unchecked, that’s the work, and it isn’t a delay. Don’t push to Phase 4 until Phases 1 to 3 are in place. Logistics built without the emotional work underneath tend to give way the first time something goes wrong. Treat both lists as a guide to where you are, not a test you pass or fail.
For Female Travelers: Permission + Safety + Solo Capability
Women who travel solo face some extra pressures and have real strengths. The same four phases apply, with a few safety habits added.
Can Women Travel Solo Safely?
Yes, and this section is about getting the facts right, not making you feel better. Female solo travelers face real, specific risks, and each one has a practical way to handle it. “Too dangerous for women” isn’t a careful look at the real risk. It lumps real danger together with fear that has grown too big, and it ignores the women who travel alone safely every year.
What Safety Practices Actually Work?
The most useful safety tool is your own intuition. When something feels off, your gut often picks up on things faster than you can explain them. That means leaving a situation before you can explain why, and turning down an offer without a reason.
Alongside that, keep your accommodation private, using a landmark instead of the address when you meet someone new. Use group activities to feel less alone in unfamiliar places. Keep your check-in schedule without exceptions. And research the neighborhood before you book. If safety is your main worry, a risk-literate approach to solo travel safety goes deeper. These are the same habits every solo traveler needs, and women tend to benefit from applying them more consistently.
Why Is This Different For Women?
Two pressures come up again and again. The first is social. Family and friends may voice worry in ways that are hard to tell apart from support, and those conversations can wear down your confidence before you leave. The permission you need there is your own: this is my decision.
The second is self-doubt. “Is it safe for someone like me?” is a question shaped by years of messages about vulnerability. Under it, many women are really asking whether they can handle problems alone. Phase 3 exists for that question, and the answer builds with every solo outing you complete.
What Permission Am I Granting Myself?
Give yourself four permissions. You may put your own needs first, because solo travel runs on your pace and interests, not a group’s. You may trust your ability, since you’ve handled life on your own for years and those skills travel with you. You may say no, to offers and invitations and situations, without explaining. And you may ask for help, from a hotel desk or a stranger with directions, because asking is using the resources around you.
Why Solo Travel Matters: Permission to Prioritize Yourself
Traveling solo for the first time matters because it gives you evidence about yourself that you can’t get another way. Fear gets you to the starting line, and this is what you get for crossing it.
What Does Solo Travel Actually Build?
Solo travel builds self-trust, resilience and independence, and group travel rarely builds all three. Self-trust comes first. When you work out a transport system, make a decision in an unfamiliar language or handle a change of plan with nobody to ask, you get concrete proof that you’re more capable than your worry suggested. It’s evidence, and it adds up over trips.
Independence is the second. Every decision is yours: you eat when you’re hungry, rest when you’re tired and drop plans that stop working. For people who spend most of life balancing other people’s schedules, that can be a relief.
Resilience is the third. Something will go wrong on every trip, and on your first you learn how you actually respond, not how your worry said you would.
If that’s the part that matters most to you, the full case for why solo travel builds self-trust lays out the reasoning.
How much of this you notice depends on the trip and on you, so treat it as what’s likely, not what’s guaranteed.
Is This Worth the Fear?
Solo travel builds self-trust because you handle things yourself and see the result. That evidence is what makes the fear worth working through.
The fear and the growth aren’t two separate experiences. Working through something that scared you is exactly how self-trust forms, and a trip with nothing new or hard wouldn’t build it.
The better question is what the fear costs you if you let it decide.
How Do Nervous Travelers Describe the Outcome?
Nervous first-timers rarely describe the trip as easy, and they rarely claim they weren’t scared. The outcome to expect is quieter than that: a version of “I didn’t know I could do that.” Picture a composite first-timer. She spends the first evening in a new city unsure, works out the metro the next morning, and by the end of the week is choosing which neighborhood to explore on her own terms. The confidence isn’t loud. It’s the quiet knowledge that you handled it, and you only get it by going.
How to Decide: Your First Destination Without Overthinking
Choosing a destination is often the hardest part of traveling solo for the first time. “I want to go but I can’t decide where” is rarely a shortage of information. It’s usually worry in disguise. A huge list of options feels safer than choosing one, because choosing makes the trip real. A few clear criteria give the decision a shape.
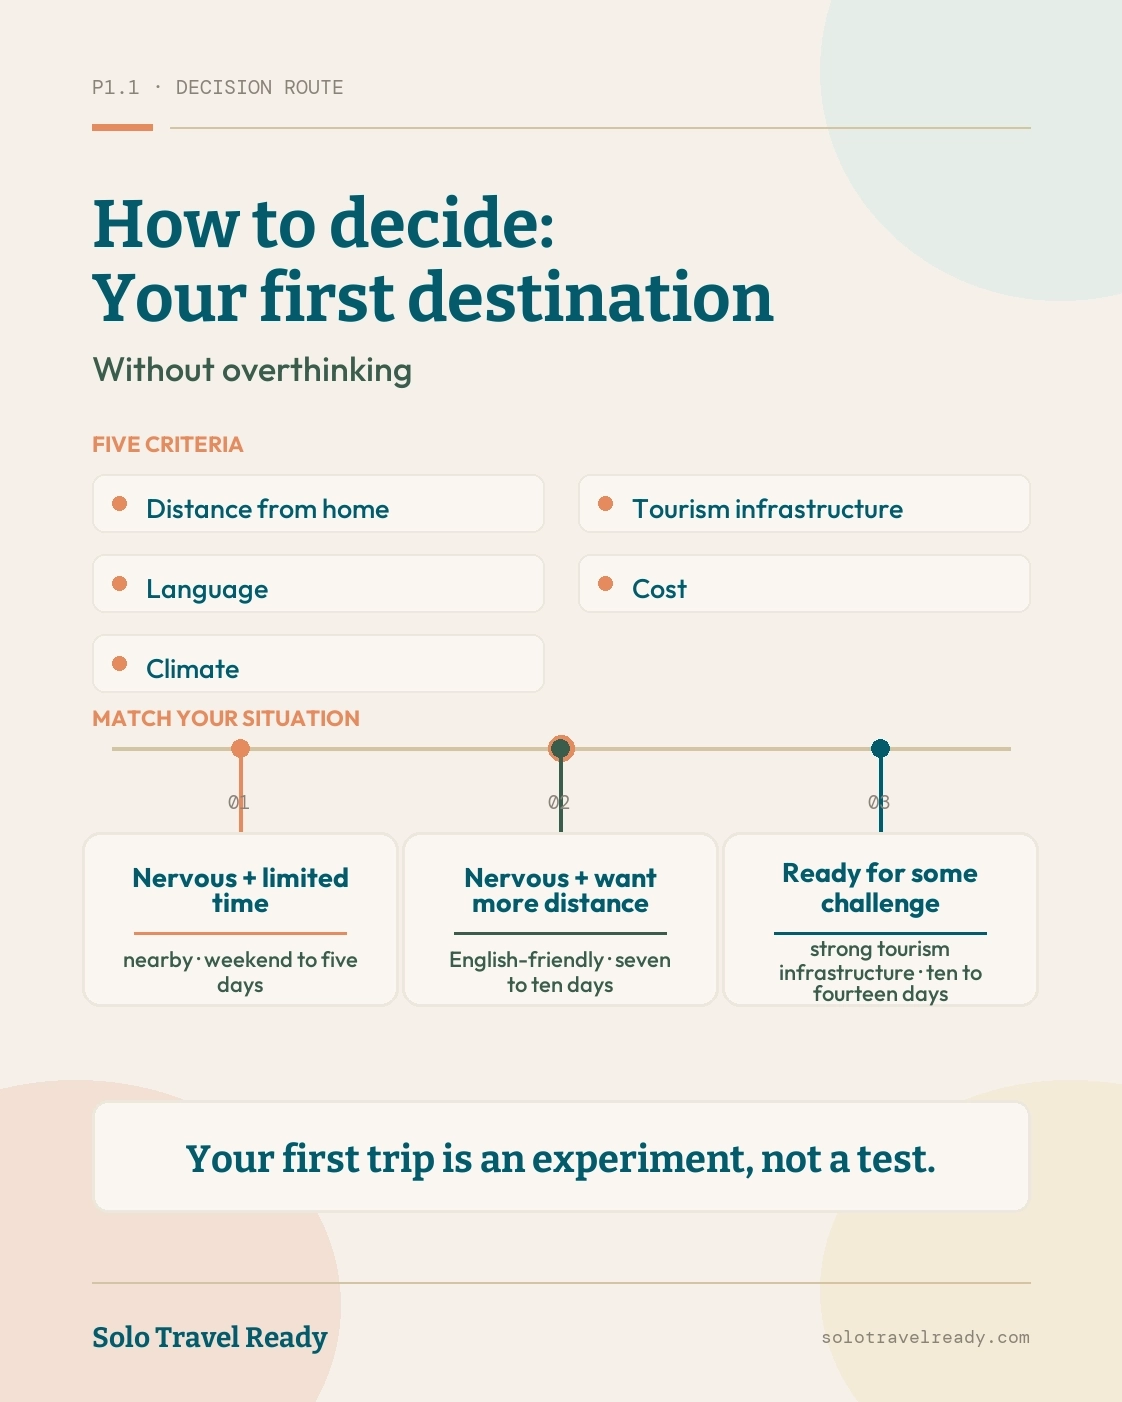
Start by scoring what matters to you. Give each one a 1 if it matters less to you, or a 3 if it matters a lot, then choose a destination that meets at least three of your five.
| Criterion | Lower worry | More stretch |
|---|---|---|
| Distance from home | Nearby, few time zones | Far, long flight |
| Tourism infrastructure | Developed, reliable services | Less developed, more improvising |
| Language | English widely spoken | Local language needed |
| Cost | Budget-friendly, less money stress | Higher spend, more comfort |
| Climate | Familiar | Unfamiliar |
Then match your situation to a route. If you’re nervous and short on time, pick a city or region near home that you haven’t visited, for a weekend to five days. If you’re nervous but want more distance and English matters, choose an English-speaking country with well-developed tourism for seven to ten days. If you’re comfortable with some challenge and have longer, pick a region with strong tourist infrastructure for ten to fourteen days, where English works in the tourist areas.
These are profiles, not recommendations of specific places. Destinations change, and the criteria stay useful. Nearby and familiar means a city in your own country you’ve never spent time in alone. English-speaking and developed means somewhere solo travel is normal and language stops being a barrier on a first trip. Well-established tourist trails mean hostels, tour operators and other solo travelers, which cuts the problem-solving you have to do.
Your first trip is an experiment, not a test. You’re choosing the trip that will teach you most about how you travel and what your real triggers are, not the ones you’re imagining. An imperfect trip you take beats a perfect one you never book. Once you’ve decided, go back to the Phase 2 steps above and start with your first three nights.
Before You Leave: Practical Logistics Checklist
This is the outside half of Phase 2, the practical stuff that keeps your attention on the trip and off crises. It’s a starter list. What you need depends on your destination and your nationality, so check each item against an official source.
Documents
- [ ] Passport validity checked against your destination’s entry rules. A six-month rule is common but not universal, so check with your government’s travel advisory or the airline
- [ ] Travel insurance bought and the policy downloaded
- [ ] Digital copies of your documents saved to cloud storage and emailed to yourself
- [ ] Paper copies of your passport and insurance kept apart from the originals
Money
- [ ] A main travel card set up and tested
- [ ] A backup card on a different network in a separate bag
- [ ] A small amount of local currency for the first day
- [ ] Your bank told your travel dates
Communication
- [ ] A SIM or data plan sorted for your destination
- [ ] Offline map downloaded
- [ ] Messaging tested with your support person
- [ ] Emergency card written: accommodation address, support person’s number, local emergency number and insurer’s emergency line
Health
- [ ] Vaccines and health rules checked for your destination
- [ ] Regular medication packed in original packaging, with enough for the whole trip
- [ ] A basic first-aid kit
- [ ] Insurance that includes emergency evacuation
Where to Stay: Your Accommodation Strategy
Where you stay on the first three nights shapes how a first trip feels. Choose it for safety and ease, not novelty.
Where to Book
Book your first three nights ahead through a platform with flexible cancellation, such as Booking.com, Airbnb or the hotel directly, and check the cancellation terms before you pay. From night four, stay flexible until you know the area. Filter for a central location within walking distance of transit and food, strong recent reviews from solo travelers, and a neighborhood with foot traffic at the hours you’ll come and go.
What to Look For in Reviews
Skip the average score. Read about fifteen recent reviews, from the last six months, which is enough to get a real sense of the place without an hour of research. Look for mentions of solo travelers, any safety concerns, and how staff dealt with problems. A place rated 7.5 with recent comments like “felt safe arriving late” and “staff were helpful” beats a 9.0 full of generic praise.
Hotel vs. Accommodation Types
Hotels, guesthouses and apartments all work for a first solo trip. Hotels give the most support, with 24-hour reception and secure entry. Apartments give you space and a kitchen, which cuts the daily decision about where to eat. If you want to meet people easily, pick somewhere with a shared space such as a lobby or a communal breakfast. If socializing drains you, choose a private room with little common space so you can recover.
Your accommodation is your anchor base, the place you come back to when the day has been a lot, so choose it with that in mind.
Your Burning Questions Answered
What is a good first time solo trip?
A good first solo trip is somewhere nearby and familiar, with good tourism infrastructure, for a weekend up to about two weeks, with the first three nights booked ahead. Aim for comfortable, not perfect. Use the destination criteria above to narrow your options.
Your Next Step
You came to this guide scared about traveling solo for the first time, and that was the right place to start. Fear isn’t the enemy of solo travel. It’s the start of the preparation that makes it work.
You now have a named system in four phases, a fear list that turns vague dread into specific problems, protocols for the worried moments before, during and after a trip, and a way to choose where to go. What’s left is small enough to do this week.
Today, pick the three fears you checked that matter most and write them down by name. This week, sort them into gaps and patterns, and schedule one solo micro-practice. This month, finish Phase 2: choose your destination, book your first three nights and set up your check-in plan. Next month, book and go.
If in-trip worry is your biggest worry, read how to keep worry from stopping the trip next.
If you need to reconnect with why you want to do this at all, start with an honest look at whether solo travel is worth it.
You don’t have to stop being scared first. You need enough structure to go while you are.
Tools & Resources for Your First Solo Trip
Features and availability change, so check each tool’s current details before you depend on it.
Apps and tools
- Google Maps: download offline maps before you leave, so navigation works without data.
- XE Currency: check current exchange rates.
- Google Translate: download offline language packs and translate signs with your camera.
- WhatsApp: free messaging over Wi-Fi for staying in touch with your support person.
- Airbnb: apartment stays with host and guest reviews.
- Rome2rio: compare flights, buses and trains for planning routes.
Official resources
- International SOS: information on travel health and getting medical help abroad.
- CDC Travel Health: vaccine info and health advice by destination.
- Your government’s travel advisory site and your embassy’s website: entry rules, advisories and local contact details for your nationality.
Start Building Travel Readiness
Your Free Prep System.
Not tips, not wanderlust, not “just go for it” advice.
Real systems. Honest experience. One focused email a month. Get 3 Free Tools the moment you join:
1. 60-Day Solo Travel Ready Checklist
Your complete prep timeline from decision to departure
2. First 48 Hours Arrival Survival Card
The exact protocol for landing confident, not lost
3. Booking Confidence Checklist
The tool for the moment the booking button feels impossible to press
No schedule pressure. Unsubscribe any time.
About the Author
Zisco Nueda is a solo travel educator and the founder of Solo Travel Ready. Zisco has traveled solo since 2001 across 35+ countries, with the deepest experience in Southeast Asia, and has consulted with 200+ nervous first-time travelers through their preparation. The Confidence Bridge framework came from seeing the same overwhelm in first-timers of every destination, age and background, and from realizing the missing piece was a system for thinking under pressure. This guide reflects that experience and is educational, not medical or mental-health advice.
Last updated: September 2026